The Core Principle
Biker patches style is built on three principles: back panel as the focal statement, intentional front patch balance (not covering every inch), and colour coordination that creates a cohesive identity. Non-MC riders have the most creative freedom — the key is making choices that look deliberate rather than randomly assembled.
“Your vest should look like it was built, not bought.”
The difference between a vest that commands attention and one that reads as a collection of random patches is not the number of patches or how expensive they are — it is intention. Every placement decision, every colour choice, every size relationship between patches either reinforces the vest as a unified statement or undermines it.
This guide is for riders who want their biker patches style to reflect genuine thought — whether you are an independent rider with complete creative freedom or a club member working within established conventions.
For placement rules and patch meanings, see our complete biker patches guide.
The Kutte — What It Is and Why Aesthetics Matter
The kutte — the sleeveless denim or leather vest worn as an MC cut — is simultaneously a uniform and a canvas. In formal MC culture, the patches it carries are earned and their placement is governed by club convention. For riders outside formal club structures, the same garment becomes a personal statement with far greater freedom of expression.
The kutte aesthetic has influenced mainstream fashion precisely because it communicates so much through relatively simple means — a vest, thread, and intentional placement. What makes it visually compelling is not complexity but clarity: you can read a well-built vest from 20 feet away and understand the rider’s identity, allegiances, and history.
Approaching your vest with that aesthetic principle — readability from a distance, clarity of identity — produces builds that work whether you are in an MC or riding independently.
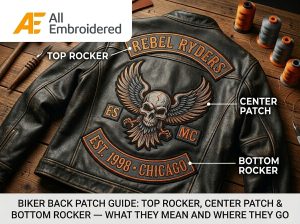
Back Panel — The Statement Piece
The back of the vest is the dominant visual surface. It is what people see as you ride, as you walk away, as you stand at a gathering. For MC members, the three-piece set fills this space with defined purpose. For non-MC riders, the back panel offers the most significant creative decision of the entire build.
Options for Non-MC Back Panels
- ▸Large single patch — A single large embroidered patch (10–14 inches) centred on the back panel creates a bold, clean statement. This approach reads well from a distance and avoids the fragmented look of multiple smaller patches scattered across the back.
- ▸Custom back panel artwork — A bespoke design commissioned specifically for the back panel — personal artwork, a custom logo, a meaningful image. This produces the most unique vest but requires the most investment in design and production.
- ▸Brand or cause patch — A large patch from a manufacturer, cause, veteran organisation, or riding event can anchor the back panel meaningfully without requiring custom production. Choose a design with visual weight proportional to the back panel size.
Whatever approach you take, the back panel should read as the visual centre of gravity for the entire vest. Front patches should complement it — not compete with it.
Front Patch Layout Principles
The front of the vest is where most biker vests and patches go wrong. The instinct is to fill available space — but a vest covered edge-to-edge in patches of similar size reads as visual noise rather than intentional design.
Visual Balance — Left vs Right
The front panel works best when the left and right chest areas carry patches of roughly equivalent visual weight — not identical size, but equivalent presence. A large rank patch on the left balanced by a name patch and small flag patch on the right, for example, creates symmetry without repetition.
The Negative Space Principle
Visible vest material between patches is not wasted space — it is what makes individual patches readable. Dense covering eliminates the contrast that makes each patch visible. As a practical guide: if you cannot tell where one patch ends and the next begins from three feet away, the layout is too dense.
Using Patches of Different Sizes Intentionally
Varying patch sizes creates visual hierarchy — large patches anchor the eye, medium patches fill the mid-level, small patches add detail. A front panel with only medium-sized patches of similar dimensions reads as flat. One large statement patch paired with smaller accent patches creates the hierarchy that gives a vest visual depth.
Biker Patches Style by Vest Type
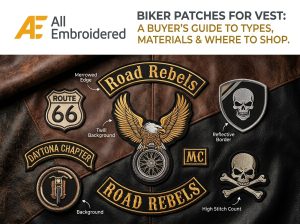
The base material of your vest changes the styling approach — leather and denim behave differently as patch canvases, and the aesthetics associated with each have distinct traditions.
Leather Vest Patches
Leather is the traditional MC cut material. It carries patches with visual weight and formality. The dark background of most leather cuts makes coloured patches pop naturally. Because leather is less forgiving of repositioning, layout decisions should be made carefully before sewing. Embroidered patches with sew-on backing are standard on leather.
Denim Cut Patches
Denim cuts allow more flexibility in both placement and removal. The lighter background of raw or washed denim creates a different visual dynamic — patches need slightly more contrast to read well. Denim also tolerates iron-on backing better than leather, though sew-on is still recommended for any patch intended to stay permanently.
Biker Jacket Patches
Jackets introduce sleeve real estate that vests do not have, opening up additional patch positioning. The reach area on a jacket sleeve (the area where the sleeve meets the back panel) requires careful placement to avoid patches that bunch or distort when the arm is in riding position. Check patch positions while seated on the bike, not just standing.
Colour Coordination for Biker Patches
Colour is the fastest way to unify or fragment a vest’s visual identity. A vest with patches in every colour of the spectrum reads as a souvenir collection — visually interesting but not intentional. A vest built around one or two dominant colours with controlled accents reads as a designed identity.
- ▸Establish a dominant colour — Choose one colour that appears across the majority of your patches. For many riders, this is the colour of their club patches or the primary colour in their back panel design.
- ▸Use black and white as neutrals — Black and white patches work with almost any colour scheme and provide visual breaks between coloured patches without disrupting the palette.
- ▸Limit accent colours to two — Two accent colours alongside your dominant colour is typically the maximum before a vest starts to read as visually chaotic. Choose accents that appear in multiple patches rather than using a different accent for every patch.
Patch Density — How Many Is Too Many?
There is no single correct answer on patch count — but there are clear aesthetic spectrums with different strengths.
Minimalist — 2 to 4 Patches
Each patch carries maximum visual weight. Every piece must be meaningful — there is nowhere for an average patch to hide. Works particularly well when the back panel is strong enough to carry the vest alone. Common in newer builds and riders who are selective about what they add over time.
Mid-Density — 5 to 12 Patches
The most common range for experienced riders building vests over time. Enough visual interest to tell a story, with enough breathing room between patches that each is still individually readable. This range gives the most flexibility to build a vest that evolves over years of riding.
Full Coverage — 13+ Patches
Tapestry-style vests with near-complete patch coverage are a distinct aesthetic statement in their own right — part riding history document, part artwork. This approach works when the patches have genuine individual meaning and colour coordination prevents the vest from reading as visual noise. It requires the most deliberate curation.
Building Your Vest Over Time
The vests that attract the most genuine attention in riding communities are almost never bought complete. They are built — patch by patch, over years — each addition marking a ride completed, a club joined, a person remembered, a cause supported. The organic approach produces vests with genuine visual texture and personal history that a purchased set can never replicate.
Starting with a strong back panel and a single meaningful front patch, then adding deliberately over time, creates a vest that tells an evolving story. Riders who buy a vest pre-loaded with patches often find themselves removing patches over time as they replace quantity with meaning.
For custom patches that match your specific design vision — from a single memorial patch to a complete club rocker set — see our custom biker patches with no minimum guide. For quality stock patches across all categories, browse our full patch range.
Frequently Asked Questions
How many patches should a biker vest have?
There is no prescribed number — the right count depends entirely on your aesthetic goals and the meaning behind each patch. As a practical guideline, most vests read well in the 5–12 patch range, where each patch has visual breathing room and individual readability. Minimalist builds with 2–4 strong patches can be equally compelling. What to avoid is adding patches to fill space rather than because the patch means something to you.
Can I mix embroidered and PVC patches on the same vest?
Yes — mixing patch materials is common on lifestyle and independent rider vests. The key is ensuring the mix reads as intentional. PVC patches have a different visual texture from embroidered patches, so place them in positions where the contrast works in your favour — for example, a PVC novelty patch as a front accent alongside embroidered main patches, rather than using both materials for similarly-positioned patches on the same panel.
How do I make my back patch the focal point?
Size, position, and contrast all contribute. A back patch should be proportionally large — filling the back panel rather than floating as a small centre piece. Keep the immediate area around the back patch clear of competing patches; crowding the edges reduces the visual impact of the centrepiece. Ensure the back patch has strong colour contrast against the vest material so it reads clearly from a distance — the ultimate test of a statement back patch.
What patches can a non-MC rider wear?
Non-MC riders have broad freedom with patch choices. Novelty patches, personal artwork, veteran patches, cause patches, brand patches, achievement patches, event patches, and custom designs representing personal identity are all universally appropriate. The restriction is specific: three-piece patch sets, 1% patches, and specific club insignia belong only to riders who have earned or been given them through legitimate club process. Outside of that boundary, independent riders have more creative freedom than any other category of rider.
Build a Vest That Tells Your Story
Browse our full range of embroidered, woven, and PVC patches — or commission a custom design with no minimum order. Every patch we sell is built to last a decade on a cut.
Also read: Biker Patches for Vest: Buyer’s Guide | Complete Biker Patches Guide